Building a new Blacksmith Shop can be an exciting prospect and can also be an important stage in your progression in the trade. Like many, I started smithing in my garage, and when the time came to build my own shop, I turned to the internet for ideas. I wanted to know “How big should the shop be? and What is the best way to lay it out?”
I scoured forums, visited countless websites, and even cracked open a few blacksmithing books for answers. What I discovered was that there are many things to consider other than just size. Since I’ve already done most of the leg work, I thought I would publish my findings here.
What to Plan for when Building a Blacksmith Shop
- Size & Cost
- The Forging Area
- The Layout & Assembly Area
- Cutting & Grinding
- Power & Electricity
- Lighting
- Floor Construction
- Storage
- Air Quality
Size & Cost
When building a blacksmith shop most agree that you should build as big of a shop as you can. A common complaint in forums is, “I wish I built a bigger shop!” That said, I think that you should build a large shop, however no larger than the situation warrants.
Everyone’s situation is different, so the size will be different as well. Many Blacksmith’s do well operating in small 250 – 500 square-foot shops, while others don’t have room to grow in 2000+ square-foot buildings.
Ultimately, size is something that only you can determine. This will largely be dependent on your building site size, local codes and bylaws, and your budget. For example, you may have room to build a 40’ x 60’ detached structure, but don’t have (or don’t want to pay) the associated $90,000 price tag.
Building costs can vary wildly based on location and who’s doing the work. Everyone’s situation is different. I personally, didn’t have the time or expertise to build a detached workshop, so I hired a local builder to do most of the work. We agreed on a budget of $50,000 for a 1000 square-foot structure.
Reference: According to HomeGuide.com the average cost per square foot to build a detached garage is $49. (2019)
A common mistake people make is only planning for the forging area and not considering the other operations that take place like assembly, grinding & finishing and storage.
It’s common and operationally efficient to batch your work, in any kind of industry, and this naturally leads to compartmentalization or zoning.
The rest of the article will discuss different zones of operation, their importance, and what to consider when planning for your new blacksmith shop.
The Forging Area
Tools and equipment should be well laid out and organized for efficiency. Efficiency meaning equipment should be within a few steps of the anvil. Not too close to be a safety hazard and yet not too far to cause the metal to cool in transit. The anvil is often set in the center of the area and the other tools and equipment needed to forge are arrayed concentrically around it. If the anvil were the hub, the other tools would be the spokes.
There are many tools and pieces of equipment that can be in the forging area, and what is ultimately in a blacksmith’s shop is specific to the smith and his or her line of work. Equipment to plan for in the forging area can include an Anvil, a Forge, a Post/Leg vise, a Power Hammer, a Treadle Hammer, a Fly Press, and a Workbench with a Machinist Vise.
Tools needed for forging should also be well organized and arrayed on racks and shelves within the forging area. Common tools to plan for are Hammers, Tongs, Files, Chisels & Sets, Hardy tools, Punches, Drifts, Fullers, Swages, Bolster Plates and Flatters.
The Layout & Assembly area
The Layout & Assembly area can and should be near the forging area. Having a layout-table is essential when working on larger more complex projects! The space beneath the worktable can be used for more storage, torches, and welders.
Large steel topped assembly tables or workbenches are perfect for welding jigs, for repetitive scrolls and curls, or any time you need to forge the same thing more than once. They are also great for making gates, fence sections, and sketching out project ideas.
TIP: Buy a used Steel Plate to save money!
At the time of writing this article, Metals Depot listed a new 4 x 8 ft x ¾ in thick steel plate for $970.24. I found used steel plates with the same dimensions starting at $250 dollars just by doing a couple of Google searches.
Another possible source for a worktop is to search in your local area and see if anyone is selling used Road Plates. Road plates vary in thickness and size based on transit-weight requirements, but typically, they are 1” thick A36 steel. Furthermore, they are already set up with holes to be easily and safely moved. It’s a long shot, but worth a try.
Regardless of where you source your steel table-top, it is going to be heavy and difficult to move. If you’re building a new shop, it would be wise to move the tabletop to the assembly area prior to framing the walls. It might look funny but it makes maneuvering such a large and heavy object much easier.
Cutting & Grinding
Have a cutting area with the ability to cut longer lengths of metal as needed. If you have a small shop, position your saw near a man-door or a small garage type door for stock clearance.
If possible, compartmentalize grinding from the rest of the shop. Grinding creates a lot of metal dust and overall poor air quality. If anyone else is working in the shop they will be affected.
You should wear eye protection and a mask or respirator when grinding. It makes a mess! A smaller grinding space makes it easy for an air treatment solution and prevents the dust from contaminating the rest of the shop.
Power & Electricity
You can run a blacksmith shop without any electricity provided you use the light of the sun to see what you are doing. Many blacksmiths work outside in a covered forge, some without walls. They rely solely on hand tools to forge their wares.
This is a traditional and quite frankly romantic approach to blacksmithing. and is one way to approach it. The other way is to have a shop with four walls and a roof powered by electricity.
Electricity isn’t complicated. You’ll need to determine your electrical requirements based on the equipment you wish to operate. A 240 volt 100 amp service might be enough, but some shops require a more robust service. Consult a qualified electrician for advice as needed.
Many welders, grinders, power hammers, and mills require a 240-volt service and depending on your equipment your service requirements will be more or less.
Since we’re discussing electricity, it’s only natural to talk about lighting in the shop.
Lighting
The two standard ways of lighting a shop nowadays are electric light fixtures and sunlight, and both types of light are advantageous when blacksmithing depending on your task.
Light Fixtures
LED lighting is the best way to go here. Sure, running led lights will save you money on your power bill, but the real benefit with LED bulbs comes during the cold winter months.
If you live in a warm climate you might not understand, but those of us out in the shop in the freezing temperatures do.
Cold weather is very hard on electric bulbs. They wear out fast, can burst, and fluorescent bulbs make an incessant humming noise.
Use LED lights for better lighting, yearly savings on your electric bill, and none of the hassles that comes with electric bulbs in cold temperatures.
Sunlight
Sometimes, there is no replacement for good old sunlight. First of all, it’s free, but secondly, sunlight does a great job of casting shadows and creating contrast.
For working with metal, particularly when filing, sunlight with northern exposure is very effective. It isn’t as strong as sunlight from the south and allows you to see subtle details in your workpiece.
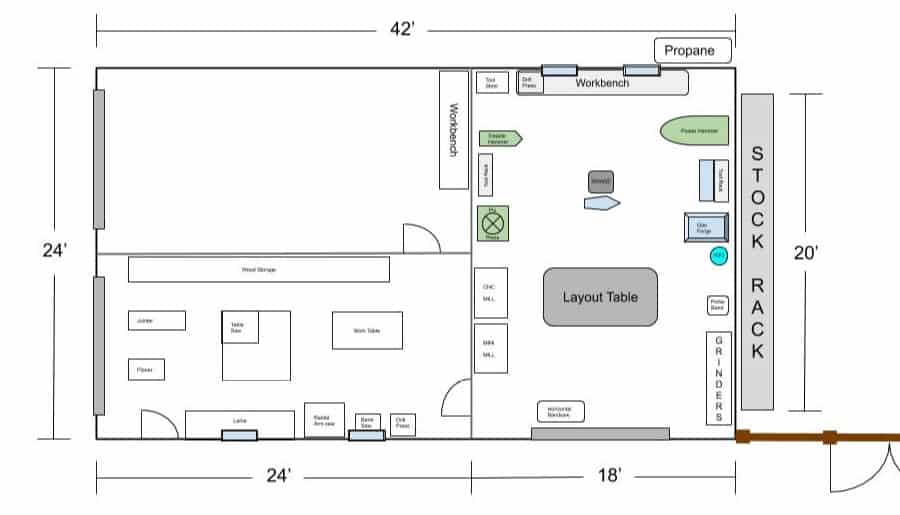
In my case, my shop is divided into two halves. The northern half is a blacksmiths shop and the southern half is dedicated to working with wood. The windows on the north side of the building give me light to work with metal and those on the south provide light and warmth during the winter months. This arrangement also helps me keep the blacksmith shop cooler year-round.
Floor Construction
There are actually more options for the floor than one might think. If you were to poll blacksmiths from around the world you would find that shop floors can be dirt, gravel, bricks, cement, and even wood.
Dirt & Gravel
There’s nothing wrong with a dirt or gravel floor. Heck, you might already have it, and if you’re building a pole barn you might be counting on it.
Comfort
A natural floor like dirt and gravel can be very comfortable. There’s a lot of give in each step and each step is different which quite literally keeps you on your toes. Floors made of gravel and brick are less strenuous on the body than cement.
Durability
Dirt and Gravel are durable, however, they often shift and move based on your blacksmithing routine. The earth around the anvil can wear into a shallow depression as you move from anvil to forge and back.
This can easily be fixed but is bound to happen again as you continue to work.
Other Considerations
Dirt is, well, dirty! Blacksmithing is inherently a dirty occupation, but dirt and gravel floors add to that. Additionally, it’s easier to lose dropped items in such a porous floor. On the flip side, a soft floor is advantageous in that dropped items have a better chance of not being damaged when they land.
Bricks
Many consider bricks to be the best floor for a blacksmith. Their surface is harder than dirt or gravel and yet not as hard and relentless as concrete. Furthermore, their slightly uneven surface is forgiving on the feet and easy to keep clean.
Comfort
A brick floor has a slightly irregular surface and is forgiving on the feet and back.
Durability
Bricks are very durable and can last for generations. If one or more bricks break they can easily be removed and replaced.
Other Considerations
A brick floor does not have any mechanical connection holding one brick to another. Gravity keeps them in place. As such, a brick floor more easily insulates sound and vibration when operating equipment.
Concrete
Concrete has its place in blacksmithing notably when laying a proper foundation for large pieces of equipment like a Power Hammer or a large Shop Generator. It’s definitely an easy way to go, though not as cost-efficient as dirt. 😉
Comfort
Concrete is the hardest surface on this list and it’s recognized by most as the least comfortable.
Durability
Concrete is very durable. Though, you can be assured that it will crack as your shop settles. It used to be that you would see entire floors poured without seams never to crack or wear. Nowadays you can be assured of two things. Concrete will continue to dry and get harder as it ages, and it will crack!
Other Considerations
Concrete transmits sound and vibration. Running a power hammer on a concrete floor will resonate throughout the rest of the shop causing vibration and noise. If you plan on using power equipment be sure to follow their specific foundation plans. Every hammer has a slightly different foundation plan so it’s best to check with the manufacturer.
For example, if you have a 100 lb Little Giant, this is the foundation plan. 100LB Little Giant Foundation Plan. (links to littlegianthammer.com)
End-Grain Wood Flooring
This might be a new concept to you. I tried to explain it to my brother in law over lunch last week and he looked at me like I had lost my mind. A end-grain floor uses wooden blocks laid like bricks with the end grain surface facing up. Basically, they are wooden bricks!
Comfort
End-grain wood floors are the most comfortable floors on this list. They have all of the advantages of brick but are more comfortable.
Durability
The flooring is very durable and conducts less noise and vibration than any of the other materials. This also results in less vibration being transmitted to the shop structure itself. If a wooden block is damaged it can be removed and replaced like bricks.
Other Considerations
End-grain wood floors are comfortable and durable, they are also potentially very expensive to install. Even if you do the work yourself, it would take a considerable amount of time and money to source, cut, and install the wood.
Storage
An entire website could be created to discuss proper storage in a shop or garage. I won’t go into that much detail suffice to say storing metals, tools, and other items are of equal importance to all of the other subjects in this article.
Long Stock
Most steel suppliers sell their long stock in 20 ft lengths, and not surprisingly that is also generally their best price point. You can most certainly buy steel in shorter lengths but if you do, you will pay more.
Check out this price comparison from Metals Depot for A36 Steel Round Bar
| Length | Price | Price per foot |
|---|---|---|
| 2’ | $2.50 | $1.25 |
| 4’ | $4.00 | $1.00 |
| 6’ | $5.50 | $0.92 |
| 8’ | $7.00 | $0.875 |
| 10’ | $5.60 | $0.56 |
| 20’ | $9.40 | $0.47 |
As you can see, the price of 20’ steel is much better than even 10’ steel.
If you have enough room, then storing 20 footers is your best best. If not, then still buy your steel in 20’ length, and then cut them down upon receipt.
Most smiths will store their long stock horizontally on multi-tiered racks with the heaviest stock on the bottom and the lightest stock on top. Additionally, the steel is organized by type i.e. round stock, square stock, flat bar, etc.
The steel can be stored outside. This works best if you live in a dry climate or have covered storage racks. The risks of rust and corrosion is dependent on your location.
Tool Steel
Tool steel projects are generally smaller projects. Also, tool steel is considerably more expensive than mild steel. Both of these factors are why tool steel is usually stored inside where it is safe and secure. 😉
TIP: 3 feet of ½” Diameter O-1 Drill Rod can cost upwards of $27!
Tool steels are stored in shorter lengths and are clearly labeled with the steel type. This can be done on smaller shelves, racks, or in a storage cabinet.
If the steel isn’t labeled (and you don’t know what it is) it’s mystery steel!
Mystery Steel
This isn’t anything new to someone just starting out. At least it wasn’t for me. I have three or four buckets full of mystery steel that friends and family gave me early on. They wanted to encourage me and thought by giving me metal that they were being supportive.
Veteran blacksmiths probably also have a bucket or two of mystery steel laying around the shop, but storage isn’t a large concern. Buckets usually do the trick as the steel doesn’t have much value.
Still, mystery steel has its advantages. I often use it when I freestyle, experimenting with new ideas. I’ve made countless hooks, and letter openers and I even accidentally found a few bits of wrought iron that I subsequently set aside for later use.
Air Quality
Last in this article, but not least, is Air Quality.
Proper ventilation and exhaust systems are essential in a blacksmith shop. Whether you use a propane forge or are burning coal, both need to have a proper exhaust system. Additionally, cutting, grinding, and welding also pollute the air.
Much of this can be combatted by having an airy structure with high vaulted ceilings and good airflow. As always, each shop will be different and you will have to use your best judgment.
Coal Forge Exhaust
As for coal forges, unless you are outside, you should always have an exhaust system in place. Most include a side draft hood with ductwork from the forge and up through the ceiling, and exiting the roof of your shop.
Propane Forge Exhaust
Propane Forges are gaining popularity for their simplicity and convenience and often should also have an exhaust system. Be sure to follow the manufacturer’s recommendations and to take further precautions based on your shop design. It’s never a bad idea to have an exhaust hood and ductwork, and quite frankly, it looks cool.
Welding Fumes
Welding puts off some nasty fumes and is harmful to the body even with short term exposure, and prolonged exposure can lead to cancer. Follow this link to see an OSHA Fact Sheet on Controlling Hazardous Fume and Gases during Welding. (links to OSHA.gov)
Good air quality is definitely not something to be taken lightly. Even though you might be using a propane forge and only do light welding, it would be wise to employ hoods and ductwork to vent the gases and fumes.
Conclusion
Planning for and building your own Blacksmith Shop is an exciting opportunity. You get the chance to get everything you want the way you want it!
There are many things to consider before building the shop of your dreams other than simply size. Hopefully, this article gave you a few nuggets of new information that will aid you in your project.